Some Thoughts on the Use of Word
a concise guide to extracting maximal value from the de facto word processor
Microsoft Word is the de facto writing tool. I like to learn the “ins and outs” of the tools I use heavily, and wanted to share things I’ve found helpful in using Word effectively. This paper captures various thoughts, ideas, and suggestions, as well as pointers for digging much deeper than this and really becoming a Word power user, if you’re so inclined. This is presented in the spirit of “you won’t use it if you don’t know it’s there”. These ideas are applicable to all document types, but by their nature the benefit of applying them increases as document size, complexity, and editing time increase. I find it beneficial, however, to make a habit of using styles and other good formatting practices even for very short documents because it makes things very predictable. It’s also the case that a number of these concepts aren’t specific to Word and can be applied, for example, in Google Docs.
I’m using a current version of Word 2016 on Windows 10 (the whole Office 365 thing has made “version” a bit ambiguous, IMO). I’ve built up the knowledge here over time since using Word 97 (starting from a wonderful book called Word 97 Annoyances; Woody Loenhard, one of the authors, remains an excellent source of MS Office information to this day). The details have changed as Word has evolved, but the mindset for how to get the most out of the program stays the same. I’d also note that much of what’s in here about Word (e.g., keyboard shortcuts) can also be applied with just a little adaptation to many Windows applications, especially the other components of Microsoft Office1.
I feel obliged to make one “soapbox” comment:
Modern word processors, like Word, aren’t typewriters. If you use a word processor like a typewriter, you will get frustrated. If you learn to use its capabilities as intended, you’ll reduce your frustration2. If you right-click on things in Word, explore the ribbons, explore the settings, really look at all of the controls and settings in a dialog box, etc., you’ll discover lots of useful features3. The capabilities available in Word are truly amazing, and it’s fun to discover new tricks, so it’s worthwhile to explore.
OK, off the soapbox.
I hope someone finds this of value, and I’m happy to take suggestions for improvements that anyone may have, either via email or using GitHub mechanisms such as issues and pull requests. My thanks to a number of folks who’ve provided suggestions on previous versions of this document. It’s grown over time, but I’ve tried to keep it from turning into a book.
David Lemire
dlemire60+word @ gmail.com
Table of Contents
This TOC gives an overview of what’s covered herein. It’s entirely reasonable to jump around if certain topics catch your eye. But I’ll be disappointed if you entirely skip the keyboard shortcuts stuff; you’ll be missing out!
- Ribbons and Phantom Ribbons
- Keyboard Accelerators & Shortcuts
- Tweak Word To Suit You
- Why I Use Draft View
- I ♥ Tables
- Some Useful Capabilities You Might Not Know About
- Alternative Ways To Select Text
- Some Really, Really Handy Shortcut Keys
- Formatting Fundamentals
- Document Templates & NORMAL.DOTX
- Customizing Word
- Useful Resources
- Footnotes
For starters, here’s a link to the PDF of Microsoft’s Quick Start guide for Word 2016, just so it’s easy to get to.
Ribbons and Phantom Ribbons
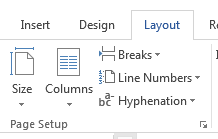
Microsoft calls the controls bar across the top of the page the Ribbon4. One thing to note about the ribbon is that each tab (Home, Insert, etc.) is broken into groups, and many groups have a small arrow at the lower right corner. The Page Setup group on the Layout ribbon is shown below as an example. Clicking that little arrow or using its keyboard shortcut opens up a dialog box with full control over all of the items related to the group, usually including a number of things that aren’t included on the ribbon. For example, the full Page Setup dialog has three tabs that provide additional options such as vertical alignment of the page content (on the Layout tab in that dialog), which isn’t anywhere on the ribbon.
Something else I’ve noticed people seem to overlook: With the ribbon interface, Microsoft Office included the concept of a ribbon that only displays when it’s relevant. Microsoft calls these “Contextual Tab Sets”, but I just call them “phantom” ribbons. These ribbons appear when you click on a table or a picture and offer controls specific to the selected object. Here is an example of the Picture Tools phantom ribbon appearing when a graphic is selected.

Selecting one of the phantom ribbons gives you access to a set of functions specific to the selected object, such as cropping and recoloring for pictures, or inserting and deleting rows and columns for tables. Some object types actually have multiple ribbons: tables have both Design and Layout ribbons (which is why they’re Contextual Tab Sets (plural)).
The ribbon can be hidden by clicking the little caret symbol at the lower right of the ribbon area, which yields more screen space for editing. There’s a control near the upper right of the title bar to control display of the ribbon (a little box with an up arrow). And you can use the keyboard shortcut Ctrl-F1 to toggle visibility of the ribbon.
Keyboard Accelerators & Shortcuts
While most folks I’ve watched rely heavily on the mouse, I use the keyboard. A lot. It’s probably more accurate to state that I use the keyboard for everything I possibly can 5. I like the keyboard because it speeds things up enormously; I’ve lost track of the number of times I’ve been asked how I did something so quickly and “I’m using the keyboard” is almost always the answer. Sadly many people’s eyes glaze over at that point, but I”m encouraging you to persevere. Apparently my brain is well-suited to absorbing keyboard shortcuts, but I really think most folks can benefit from them. Using the keyboard is also more accurate than mousing around, so it can also save you time by keeping you from wasting time using the mouse, not quite getting what you want, and then having to backtrack and try again.6
Keyboard accelerators are a significant part of gaining speed with the keyboard. Pretty much everywhere in Word you can use (tap & release) Alt, <letter key> or (hold) Ctrl‑<letter key> to get to a function. With Word 2016, if you tap the Alt key, you’ll see something like this: 7

Those letters and numbers in black boxes are accelerators: type Alt, W and you get the View ribbon, type Alt, N and you get the insert ribbon. Once you get to a ribbon, the letter boxes there take you to individual functions. For example, as shown below, Alt, N, T equates to Insert, Table and brings up the dialog with different ways of inserting tables.

Accelerators are indicated by black letter boxes on ribbons and underlined letters in dialog boxes. If there are lot of functions on a particular ribbon, some functions have a two-letter accelerator; for example, you can select paragraph alignment (on the home ribbon) with Alt, (H)ome, AL / AC / AR / AJ, for aligning Left / Center / Right / Justified, respectively (admittedly, these start to feel a bit clumsy, even to me, but they do let you keep your hands on keyboard).
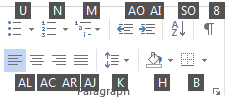
Note that you must tap the Alt key and type the ribbon selection letter even to get to the functions on the currently displayed ribbon. While that might seem a bit silly, it has the advantage that the key sequence to reach a particular function is always the same, regardless of what ribbon is currently displayed. This lets you develop “muscle memory” for the things you use a lot.
Some accelerators are hard to see: if the accelerator in a dialog is the letter “l” (lower case “L”), for example, the underline can be hard to spot because the letter is so narrow. In some dialogs there are even a few instances of punctuation marks as accelerators. So they may be hard to spot, but they’re almost always there.
Throughout this document, underlined letters are the accelerator keys I see when using Word 2016. Since the ribbon interface was added in Word 2007, sometimes the accelerator letters aren’t part of the label, so for those I’ve put the letter in parenthesis; for example: View, Draft (E).
There are also a lot of pre-defined keyboard shortcuts wired into Word by default (you can change any of these, by the way, or add your own – see the section later on customization). Ribbon items that have pre-defined shortcut keys display them in the tool tip if you hover the mouse over the icon for that item (e.g., hover over the Find function on the Home ribbon menu, you’ll get a tool tip that identifies Ctrl+F as the keyboard shortcut for the Find function).
A technique I’ve found useful for memorizing shortcut keys is this: find the function you want on the ribbon and hover the mouse to get the shortcut key in the tool tip. Then immediately use the keyboard shortcut instead of clicking on the function. A few times through that and they’ll start to stick in your brain. Pretty soon you’ll automatically be typing Ctrl-F when you want to find something.
The ultimate shortcut key, of course, is Ctrl‑Z (Undo).
Tweak Word To Suit You
Word is highly configurable, and exploring the range of controls available under File, Options may help you find places to tweak behavior that you find annoying. Some configuration tweaks I particularly recommend:
-
I find most of Word’s automated formatting, where Word tries to anticipate what you want and give it to you, to be wrong about half the time. Typing Undo (Ctrl‑Z) immediately after the automated change will fix most of these when they happen, but you can turn them off entirely. In Word 2016, this is under File, Options, Proofing, and the Autocorrect Options… button at the top of the dialog. The options on the “AutoFormat As You Type” tab are where most of the things you want to turn off are located. Most of these are pretty obvious. The group in the middle labeled “Apply as you type” contains ones I’d particularly recommend turning off.
-
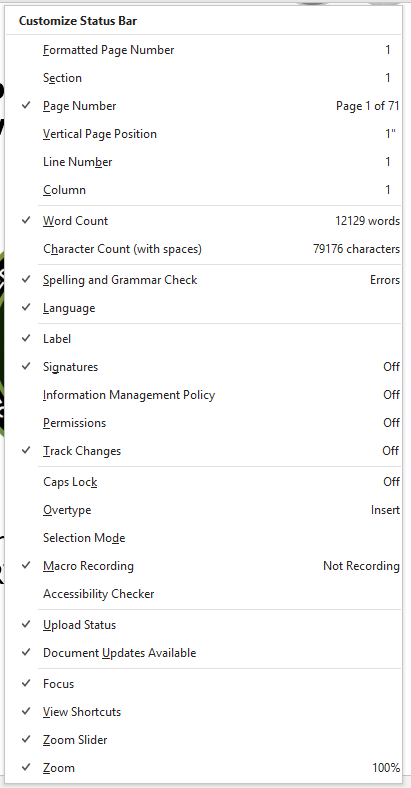
There are quite a few information items that can be displayed on the status bar at the bottom of the Word window, many of which are off by default. Right-clicking on the status bar displays the list shown below; you can click on individual items to toggle whether they appear on the status bar. Some of the items (e.g., the Track Changes status) can also be clicked to change their status (e.g., turn change tracking on and off).
-
Word stores most of its defaults, including the formatting of a “blank document” in a template file called NORMAL.DOTX; with Word 2016 on Windows 7, this file is stored under C:\Users\<username>\AppData\Roaming\Microsoft\Templates. If you want a to change the look of the blank document you get from File, New, you have to
- open this file,
- adjust its default formatting to what you want the most, and
- save it as a template, not a document (see the section later on Templates for more details).
Note that the AppData folder in Windows has the “Hidden” attribute set, which might make it a little hard to find. You can type in the path, or you can change the View settings in Windows Explorer so that Hidden and System folders are visible (I suggest doing the latter).
Why I Use Draft View
OK, this might be a soapbox thing, too. I use Draft view (Alt, View, Draft (E)) probably 75+% of the time when using Word and I think people are missing out by not using it, so here’s some of the whys and wherefores of Draft view:
-
Draft view is often a more efficient way to work on a document than Page Layout / Print Layout view: you don’t waste screen space on page headers and footers, you can really concentrate on the content, etc. Many people seem resistant to Draft view, preferring to see exactly the page layout. My thinking is that if I’m using well-constructed styles, etc., page layout pretty much takes care of itself and I can defer little tweaks to fix it up until the time I’m close to caring about a printed version; that’s when Print Layout view comes into play.
-
If you’re using Draft view, you can also turn on the style view column on the left-hand side. To get this, select File, Options, pick the Advanced option, scroll down to the Display group, and set the “Style Area pane width in Draft and Outline views” value to somewhere around an inch or so. Once the pane is visible, you can easily adjust its width with the mouse (yes, I do use the mouse sometimes). With the style area pane visible, you can now see at a glance how paragraph styles are being applied to your document (and I greatly encourage learning to use styles and doing so routinely), which makes it much easier to understand how and why things are being formatted the way they are. Also, if you’ve got the style view column displayed, a single click in that area selects the entire paragraph to the right of where you clicked, which is often very handy. Click-and-drag in the style view column quickly selects a range of complete paragraphs without overshooting or undershooting, making it easy to select a big block of text (this is another case of me preferring an approach that offers high accuracy, albeit this time with the mouse).
-
Another useful option with Draft view is to set Word to wrap your text to the size of the screen (or window), rather than the defined margins for the printed page. While this means the word wrapping doesn’t match the eventual formatted, printed product (which I realize drives some people completely crazy), it also maximizes the amount of content you can get on a screen for any given zoom level, and it means the text rewraps to fit the screen as you zoom in and out, which I think is pretty handy. This is controlled with the “Show text wrapped within the document window” setting under File, Options, Advanced, Show Document Content group. I particularly like this when projecting a document in a meeting, since you can easily get the text big enough on screen for folks to read without any need for horizontal scrolling.
Beyond Draft view:
If you really want the Print Layout view but find the page headers and footers distracting or space wasting, you can double-click in the space between pages on the screen to suppress the display of the white space. Double-click on the line between pages again to restore display of the headers and footers. This also appears as a control option under File, Options, Display.
It’s not specific to Draft view, but it’s worth knowing that there are some handy built-in zoom settings on the View ribbon or if you click on the percentage number in the zoom control in the bottom right corner. Some of these are only relevant in Print Layout view:
-
“Page width” sets the zoom so that the horizontal width of the page fits in the window. (Alt, W, I)
-
“Whole page” sets the zoom so that one entire page fits in the window. On the ribbon this is View, One Page (Alt, W, 1 (number one))
-
“Text width” sets the zoom so that the horizontal width of the text between the margins fits in the window (this one isn’t on the ribbon).
I ♥ Tables
Tables are the way to structure data into columns; using tabs to do it will eventually lead you into a mess (and a rubber room), and content in table cells is much easier to edit than three or four lines of text that have been tabbed half-way across the page and wrapped using paragraph or line breaks (yes, I have seen documents where people did this, and no, I didn’t enjoy editing that mess). Tables are a great way to organize things like reference document lists, glossaries and lists of acronyms, among other things. You can use the Borders control on the Table Design ribbon to make the cell boundaries invisible so that it’s not visually apparent that there’s a table, but the underlying table structure makes it a whole lot easier to edit the information, add new items, sort the content alphabetically, etc. If you do this, you might want to turn on View Gridlines on the Table Layout ribbon while editing so you can see where the boundaries are.
Tables are also an excellent way to structure data for forms, signature blocks, etc. One of the advantages of tables is that you can set table cells to specific sizes both horizontally and vertically, providing precise control over the appearance of text on a page and the relationships among different bits of information.
An example would be a signature block made from a one cell-wide by two cell-high table. The upper cell is set to 0.5” high, and the Borders control on the Table Design ribbon is used to place a horizontal line between the cells for a signature line when this is printed. You can also use the Properties dialog from the Table Layout ribbon to align your signature block left, center, or right as you wish for your document.
That Properties dialog is the place to go for a lot of your table formatting needs: row height, column width, heading rows, etc.
When moving in a table, the tab key moves you forward by cells; shift-tab moves you backward. Typing tab when the cursor is in the last (bottom-right) cell of a table adds an empty new bottom row formatted the same as the one the cursor was in, and is a quick way to extend a table. Typing Return in the upper left cell of table at the start of document inserts a blank, non-table line above the table, as will the Split Table command on the Table Layout ribbon (Alt, JL, Q).
When formatting a table of any size, it’s usually handy to set the first row(s) to be headers that repeat, in case the table spreads across a page boundary. Also, Word defaults to allowing table rows to break across page boundaries, but I usually turn that off unless I’ve got a lot of content in a row, since I prefer to keep the content of each individual row on a single page; look for the checkbox labeled “Allow row to break across pages” on the Table Layout, Properties (Alt, JL, O), Row tab and clear the check to keep your row contents together on a single page. You can apply this to individual rows, or select the whole table (Table Layout, Select, Table, (Alt, JL, K, T)) and apply this setting to the whole thing.
A possible problem solver: If a table isn’t displaying the way you think, check the row properties Table Layout, Properties (Alt, JL, O), Row tab to see if the row has been set to a specific height. If so, turning that off may help your problem. (Same holds for column properties, but you’re more likely to want to lock those to particular widths than you are rows to a particular height.)
Some Useful Capabilities You Might Not Know About
Paste Special. Normally when you paste text and graphics, Word attempts to retain the text’s formatting information or embeds the graphic as an “object” that can be edited in its native application (e.g., PowerPoint) by double-clicking on the object. There are times that default behavior gets in the way, rather than helping you. When this happens, undo (Ctrl-Z) the paste operation and look at the options under Alt, Home, Paste (V), Special for alternatives. Pasting as “unformatted text” is often handy when you’re moving text from one document to another and you want the next text to conform to the formatting in the destination document. The options under Paste Special vary depending on what you’re pasting (e.g., having text vs. graphics in the clipboard gives a very different list when you invoke Paste Special).
Paste Text Only. One of the most useful options under Paste Special is Paste Text Only (also available at the top level of paste: Alt, Home, Paste (V), Text only). Normally, Windows does its best to preserve the format of things as you copy and paste within or among different applications. Sometimes that’s great, sometimes you’re rather let the program into which you’re pasting control the formatting. Paste Text Only also has another great use as a problem solver. Sometimes, no matter what you do, you can’t get Word to format something the way you want; somehow, the formatting history of a paragraph or some underlying document file corruption gets in the way. When this happens, create a blank paragraph and apply the Normal style to it. Copy the text you’re trying to fix from the problem document, then Paste Text Only into the new paragraph. Now format the new paragraph the way you want it, and delete the old one. In the most extreme case, it’s also possible to copy an entire document’s contents and Paste Text Only into a new, blank document if the overall document formatting is really scrambled. That’s something of a desperation measure (i.e., “nuclear option”), but it can save a lot of retyping if a document can’t be repaired any other way.
Convert Text to Table. I love this one and use it frequently: A really quick way to create a table structure is to type the column headers you need separated by tabs. Don’t worry if this runs past a single line of text, just type column name, <Tab>, column name, <Tab> until you’ve got them all. Then select the line(s) of text you just typed and invoke Alt, Insert, Table, Convert Text to Table (Alt, N, T, V); specify to separate text at Tabs and you’ll quickly have a table with the columns you defined. You can then tweak the columns widths, format the text, etc. Here’s a screenshot illustrating the before and after of this technique.
I can then place the cursor in the last cell, hit the tab key to create a blank next row, and I’m ready to start capturing an address list.
Navigation Pane.8 If you’ve formatted your document using Heading styles for your section and subsection headings, the Navigation Pane (View, Navigation Pane (Alt, W, K) will (1) quickly show you the document structure, and (2) let you jump to any heading in the document by clicking on it in the headings list. Click on any heading in the Navigation Pane and the document view will jump to that point. This is enormously handy for quickly navigating around a big document.
Drag’n’Drop A Copy. You probably know that if you’ve got text selected, you can drag and drop with the mouse to move it. But if you hold down the Ctrl key while you drag and drop, you drag and drop a copy of your text.
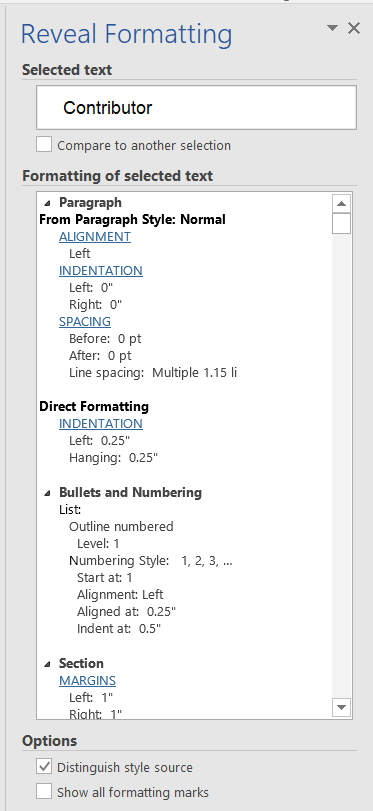
Reveal Formatting. Sometimes you just need the details of how the thing you’re looking at is formatted; thankfully, Word can do that. Typing Shift-F1 toggles the visibility of a Reveal Formatting pane on the right side of the window. This will show the formatting of the text at the cursor, including font, paragraph, and section settings. The paragraph list also indicates what paragraph style has been applied, making it easy to see the style and outline level of the current text.
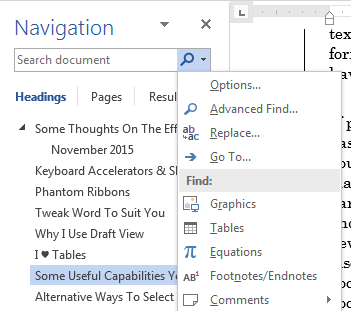
Search for Formatting. When you search (Ctrl-F) Word will show the Navigation Pane and place the cursor in the Search Document field. At the right edge of that field is a magnifier icon and a tiny triangle. Clicking on that triangle exposes a number of advanced search options that can help you find what you want more quickly. If you pick the “Advanced Find” button in that list, you get the full Find and Replace dialog. Clicking the More button there exposes more search features, one of which is formatting. You can search for text formatted in particular ways or with a particular style. If you leave the “Find what:” field empty, Word will find any text with the formatting you specify.
Wildcard Searches. Another thing the “More” button exposes is a button labeled special, which lets you search for things like tabs and paragraph breaks. There are also wildcards like “any digit”, so you could search for 3-digit numbers by using three “any digit” wildcards in a row as your find text (the wildcards can also be typed directly, like ^# for any digit). With a little thought, you can specify very precisely what you want to find, or create a wildcard search that will get all variants of something you’re looking for.
Alternative Ways To Select Text
Selecting text is a frequent operation, since you select text so you can format it, delete it, copy (or cut) and paste it, etc. You can always select text with the mouse, and you can hold down the Shift key and use the cursor keys to move the cursor, selecting text as you go. But there are some other alternatives that can be really helpful and easier than these, particularly when selecting large amounts of text. One of these is selecting paragraphs by clicking in the Style Area pane, as described above. There are a couple of other useful ones:
Extended Select Mode. Pressing F8 enters extend text selection mode; you can then use cursor keys, page up / page down, etc. to select a range of text. This is a lot more controllable than scrolling with the mouse pointer at the top and bottom edges of the screen (that may have worked fine in the days of Pentium processors, but on a modern computer it’s like trying to steer a horse galloping at warp speed).
Typing F8 followed by a character selects all of the text from the cursor to the next occurrence of that character. So, to highlight all of “[this is just a note tucked in the text]” if the cursor is before the open bracket “[“, type F8 followed by a closed bracket “]”. So hitting F8 followed by the return key selects everything from the cursor up to and including the ending paragraph break of the paragraph you’re in.
Another use of F8 is hitting it sequentially to select more and more text. Hit F8 once to enter selection mode (as described above). Hit it a second time to select the current word. Third and fourth hits select sentence, then paragraph. Using Shift-F8 reverses the process, reducing the size of the selection. Hitting ESCape gets you out of selection mode entirely. The text you’ve selected up to the time you hit ESCape is still selected; you can take action on the selected text, or just move the cursor and go on to something else, unselecting the text in the process.
Column Select With The Mouse. Holding down the Alt key while you click and drag allows you to select a column of text, regardless of wrapping and paragraph / line breaks. This can be particularly useful when cleaning up imported text.
Select Table Columns or Rows. Clicking to the left of a table row selects the whole row. Hovering at the top of a table column will change the mouse cursor to a small down arrow; clicking then will select that table column.
Some Really, Really Handy Shortcut Keys
You can do most everything with the mouse but you can also do most everything with the keyboard and it can be a lot faster. The following list is based on the principle that it’s worth learning a few keyboard shortcuts to gain a notable amount of efficiency. If you want a complete list, an article at Laptop Magazine’s website explains how to get a list of all Word keyboard shortcuts9.
-
Don’t neglect the basic Windows shortcuts for cut, copy and paste, as these alone can save a lot of time:
- Ctrl-x cuts the selected text to the clipboard.
- Ctrl-c copies the selected text to the clipboard.
- Ctrl-v pastes the clipboard to the document, replacing any text that’s selected.
-
Ctrl-z is undo / Ctrl-y is redo (as in, reverse the undo operation just performed).
-
Ctrl-p brings up the print dialog for the current document.
-
F4 repeats the last action, which gives, for example, a quick way to apply a style selection to a bunch of non-contiguous paragraphs.
-
Shift-Ctrl-Space enters a non-breaking space (sometimes called a hard space). Great for keeping “Volume 2” together on a line. Much preferred to the use of a line break (Shift-Enter) before “Volume” (in this example) because it will allow paragraph wrapping to proceed normally when the text changes. Non-breaking spaces show up as a little raised circle instead of a dot if you’ve got non-printing characters displayed.
-
Shift-Ctrl-Hyphen enters a non-breaking hyphen (sometimes called a hard hyphen). Great for keeping “auto‑format” together on a line. Ditto on how this is better for rewrapping.
-
Typing Control-Hyphen inserts a condition hyphen, which can clean up wrapping if a really long word (e.g., supercalifragilisticexpialidocious) appears at the end of a line.
-
Ctrl-K brings up a dialog for you to assign a hyperlink to the currently selected text.
-
Ctrl-<arrow key> moves you by:
-
Words forward and backward (left and right arrows)
-
Paragraphs forward and backward (up and down arrows); note that this works a little oddly in a bullet list, as Word seems to consider the bullet as its own paragraph separate from the text associated with the bullet
-
-
Ctrl-Shift-<arrow key> moves by word / paragraph, selecting the text as you go.
-
Ctrl-Del deletes by words going forward.
-
Ctrl-Backspace deletes by words going backward.
-
Shift-F3 toggles the word your cursor is in (or the currently selected text) through lower case, Title Case, ALL CAPITALS, and back to lower case 10.
-
Shift-F1 toggles visibility of the Reveal Formatting pane.
-
Ctrl-Shift-8 (or Ctrl-*, if you prefer) toggles the display of hidden formatting (e.g., tabs, spaces, paragraph breaks). This gives you, for example, a quick way to see whether a line ends with a paragraph break or a line break and then turn that display back off.
-
Control-Shift-E turns revision tracking on and off. This is handy if you don’t care to track fixing a simple typoo (oops, typo) but do want to track significant revisions, because it gets you into and out of change tracking mode very quickly. There’s an indicator in the status bar at the bottom that shows “Track Changes: On” if change tracking is turned on. If you really just have to use your mouse, you can click on the status bar indicator to turn change tracking on and off, which is still a lot faster than going through the menus to get there.
-
Alt-Shift-<arrow key> moves a paragraph either hierarchically (left / right) or linearly (up / down) through the document; there’s no need for selecting text, just have the cursor in the paragraph you want to move:
-
Alt-Shift-Left/Right promotes and demotes paragraph headings (e.g., Alt-Shift-Right Arrow would convert a paragraph with a “Heading 2” style into one with a “Heading 3” style). This works in any view, but is easiest to see and play with if you switch to Outline view temporarily.
-
Alt-Shift-Up/Down change the order of paragraphs (e.g., Alt-Shift-Up Arrow would move the current paragraph before the previous one). Most of the time this works great; occasionally it gets glitchy (I haven’t been able to work out a reason why or the pattern of when it doesn’t do what I want/expect), so watch your results when you do it. Use Undo (Ctrl-z) right away (multiple times if necessary) if you didn’t get the results you intended and instead use cut/paste to do your paragraph move instead (while you growl under your breath at Microsoft).
-
-
There are several useful search and replace shortcuts:
-
Control-F invokes the Find (search) dialog, which in Word 2016 shows up in the Navigation Pane at the left (the pane appears when you type Control-F if it isn’t already displayed)
-
Control-H invokes the Find and Replace dialog (in this case you get the dialog, not the Navigation Pane)
-
Control-Page Up / Page Down search forward and backward for the current search term if you moved the cursor out of the Navigation Pane search field. So, to find the first instance of what you’re looking for, hit Control-F, type in your search term, and hit Enter. At that point either hit Escape or click with the mouse to get the cursor into the document, and search for further instances by typing Control-Page Down. You can jump back to previous instances of the term with Control-Page Up, much more quickly than you can change your search direction from down to up in the find dialog.
-
-
If you have more than one document open, Ctrl-F6 key swaps among documents (and Shift‑Ctrl‑F6 does so in the reverse order).
-
If you have more than one “pane” open (e.g., you’ve split the screen, you’ve got the comment editing pane open, you’ve got the footnote editing pane open), the F6 key swaps the cursor between panes. Sometimes it can be hard to see what pane you’ve switched to.
-
Keys that create paragraph / line / page breaks:
-
Enter terminates a paragraph and creates a new one.
-
Shift-Enter inserts a line break, but the text before and after the line break are still the same paragraph, which is important to understand when applying paragraph formatting (this is discussed in more detail below).
-
Ctrl-Enter inserts a page break, which (oddly) has the same paragraph style as the paragraph you were in when you created it.
-
-
If you have text selected, you can quickly increase or reduce its font size using Ctrl‑Shift‑> and Ctrl‑Shift‑< (those are the greater than / less than symbols).
-
Ctrl-Q returns selected text to the formatting defined by the underlying paragraph style.
-
Ctrl-space removes direct formatting (bold, italic, etc.) from select text and returns it to the text formatting defined by the underlying paragraph style.
Formatting Fundamentals
Formatting is both one of Word’s greatest strengths and one its greatest sources of frustration, partly because it’s mostly but not quite completely consistent. I’m going to tackle it by looking at it three ways:
-
Document formatting, which is where you control things like margins, columns and headers and footers; that is, things that control the look and layout of the page. Word files can be broken into sections, and these aspects of page formatting can vary among sections.
-
Paragraph formatting, where you control things like indents, justification, line spacing within, before and after paragraphs, and some aspects of page breaks.
-
Structural formatting, where you use Heading styles to give a document a hierarchical structure (sections, subsections, sub-subsections, and so forth), plus the use of styles in general to make all of this easier and more consistent.
Word stores formatting with the item it applies to: the document, section, or paragraph. To really get Word formatting, you have to think in terms of formatting a section or paragraph as a thing, rather than in terms of inserting a formatting code at a particular location in the document 11.
Document Formatting
Document formatting controls what pages look like overall. This is where you format paper sizes, portrait/landscape orientation, margin widths, and a number of other items pertain to the overall look of a printed page. Document level formatting is mostly found in the Page Setup group of the Layout (P) tab of the Word ribbon. If you need to have different page layouts for different parts of the same document, you set that up by breaking the document into “sections” (using one of the section break types under Layout (P), Breaks), then formatting each section as desired. Note that section breaks are mostly invisible unless you’re either in Draft view or you turn on one of the options to show hidden formatting. The figure below shows the way sections make up a document and the list afterward tells where to find the various aspects of document/section formatting when you need them.
(NOTE: the following figure needs updating, the File, Page Setup direction is wrong, but the table below the figure points to the right places in current versions of Word.)
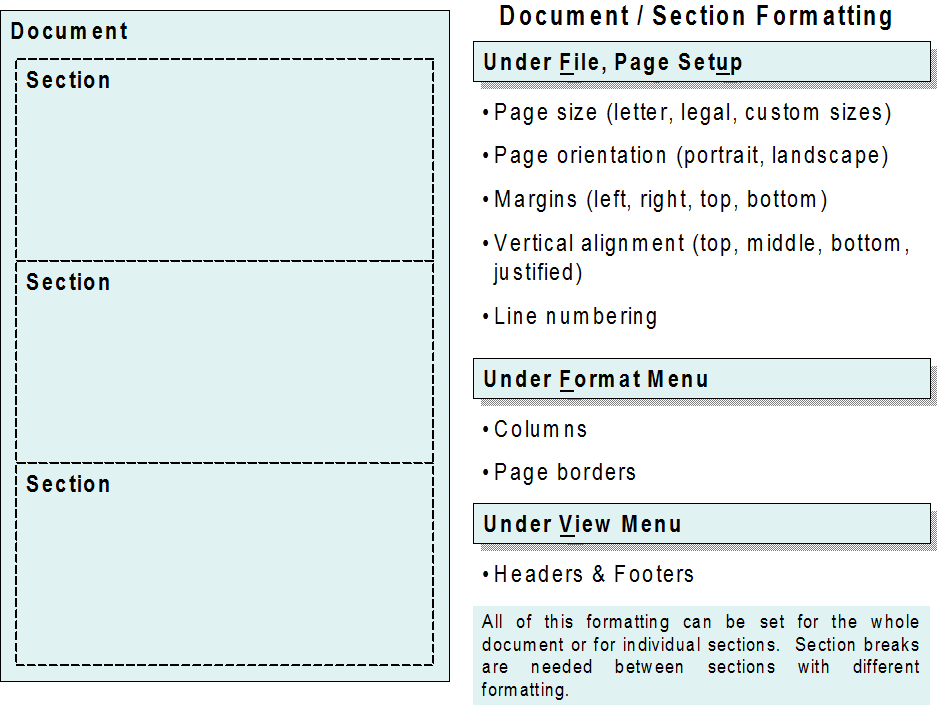
| Layout Tab | Insert Tab | Design Tab |
|---|---|---|
| - Margins - Page Orientation - Page Size - Columns - Line Numbering - Section Breaks - Vertical Alignment (in full Page Setup dialog) |
- Headers and Footers - Page Numbers |
- Page Borders - Background Color - Watermarks - Predefined Document Styles |
So, if you want your new document’s title, date, version, etc., to be vertically centered on the front page you’d set that using the Layout tab of the Page Setup dialog, accessed through the Page Setup group on the Layout ribbon (Alt, P, SP). To have the rest of the document then aligned to the top of the page, you insert a section break of the “next page” type after the cover page material, and then format the new section accordingly, again using the Page Setup dialog. Section breaks are inserted using Layout (P), Breaks; you have the option of making the new section also start on a new page by picking the appropriate section break.
If you select some text and apply certain kinds of formatting (e.g., making a part of your document 2-column), Word will automatically insert “continuous” section breaks around that section.
Note that these sections are a Word thing for specifying the page formatting of your document. They have no relationship whatsoever to Sections, Chapters, Volumes, etc., in a document structure / table-of-contents sense. In other words, they pertain to the structure and appearance of the Word document file rather than the structure of your document content. The document file section can be displayed on the status bar in the lower left corner next to the current page number. You can also print a single section by picking “Pages” in the print dialog and entering “sx” where “x” is the section number you want to print.
Line numbering (enormously useful for document review) is under Layout (P), Line Numbers (LN), which includes control over if and where line numbering gets reset. Unfortunately, that location isn’t where you control the appearance of your line numbers: that’s set with the “Line Number” style. Change that style to change the look of line numbers. The default “Line Number’” style is simply the default paragraph font and size specified in the Normal style; I prefer line numbers to be smaller than my text so they’re less obtrusive. Since sans-serif fonts are more readable in small sizes, I will typically set the font formatting of the Line Number style to something like 8-Point Arial, Calibri or Verdana.
Paragraph Formatting
Paragraph formatting is a group on the Home menu. The basic options are there; for complete control you’ll need the paragraph formatting dialog (Alt, Home, Paragraph (PG), or right-click in the text you want to alter and pick Paragraph). Paragraph formatting controls the appearance of the paragraph, and the flow of paragraphs with regard to page breaks. The figure below shows how the features of the Paragraph dialog Indents and Spacing tab control the format of paragraphs with regard to the overall page format established using the Layout, Page Setup functions.
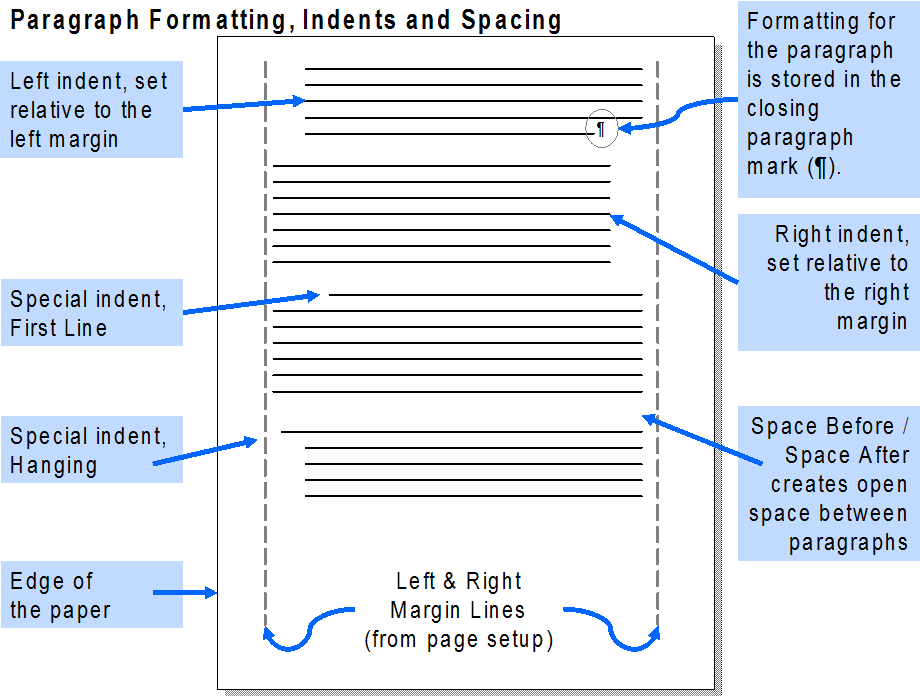
Paragraph formatting information is effectively stored in the little paragraph symbol (the reversed-P thingy: ¶) at the end of the paragraph. These appear when you click the Home ribbon’s “Show/Hide” button that has the ¶ symbol on it (or type Ctrl‑Shift-8). One implication of the fact that the formatting is in the end of paragraph mark is that when you’re trying to copy or move a complete paragraph, you have to do two things to get it right:
-
Select all of the paragraph, including that ending paragraph symbol. If you don’t have hidden items displayed, this means that to be sure you have to include the apparent space after the last character in your text (a little harder to be sure about if you have any actual trailing spaces).
-
Copy or Cut the selected text, then place the cursor at the very beginning of the first line of the paragraph before which you want the pasted text to appear, then paste.
This is one of those operations where the ability to select a whole paragraph in Draft view comes in really handy.
Because it’s important to know where the paragraph marks are in order to keep track of the how’s and why’s of your document’s formatting, it’s extremely helpful to turn on the display of paragraph marks. You can do this by clicking the “Show/Hide” button, but that also turns on the display of spaces as dots, which adds distracting screen clutter. A better approach is to go to File, Options, select Display and check “Paragraph marks” in the Formatting marks group. Turning the view of tabs here can also be very helpful.
I can’t emphasize enough how using the Spacing Before or Spacing After aspect of paragraph formatting (on the Indents and Spacing tab) is a much better way of creating open space between paragraphs than either blank lines (which are really empty paragraphs) or line breaks (Shift-Enter) that don’t create a new paragraph. This is one of those places where not using Word as a typewriter really pays off in it taking less effort to create your document, in formatting it consistently, and in making it easier to update. For most things, I find it simplest to use the Spacing After setting to create a 6-point (1/2 line) space after each paragraph. This gives a nice, easily-readable layout without wasting a lot of space (this is, by the way, the default formatting of the Body Text style that’s a standard part of several different document templates supplied with Word).
The Line and Page Breaks tab of the paragraph formatting dialog includes two options, “Keep With Next” and “Keep Lines Together”, that are important to managing pagination, but easy to confuse. Checking the Keep With Next option tells Word “keep this paragraph together on the same page with the paragraph that follows it.” In contrast, checking the Keep Lines Together option tells Word “keep all of the lines of this paragraph together on the same page.” Used correctly, these formatting options, along with the “Page Break Before” setting, makes getting appropriate pagination pretty much automatic, versus the pagination gotchas that you’ll almost inevitably have to go back and fix if you use either a bunch of blank lines (Enter) or manually entered hard page breaks (Ctrl-Enter) to control where page breaks occur.
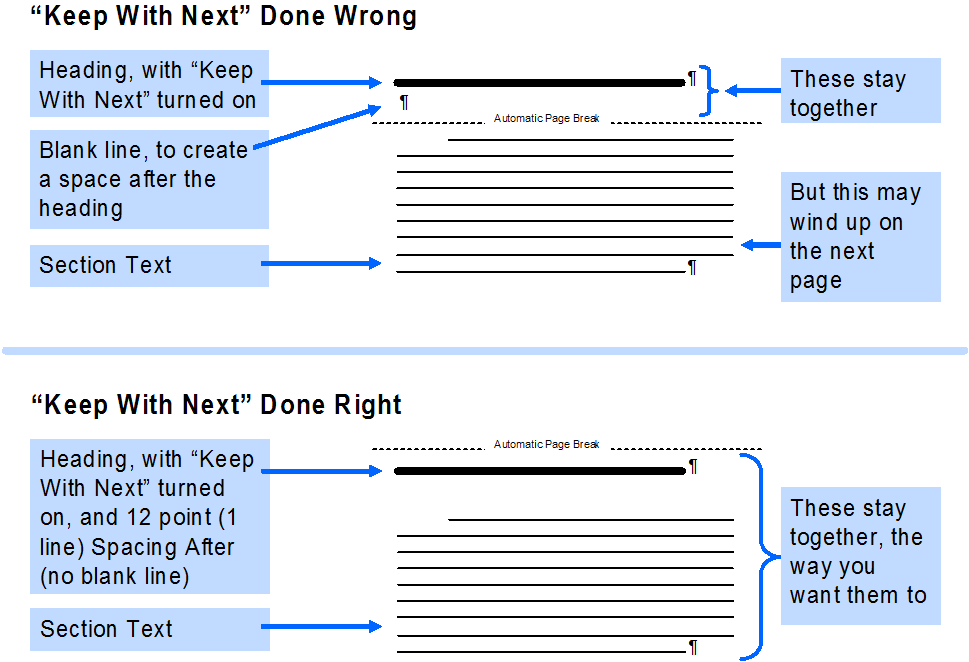
One important dimension of this concerns keeping section headings with the text they label. If your document contains a heading, followed by a blank line, followed by the first paragraph in the section, then an automated page break can fall between the heading and the text, even when the heading style has the Keep With Next formatting attribute set. The result is that your heading will be at the bottom of one page and the text it heads on the top of the next 12. If the Spacing After method is used instead of a blank line, then Keep With Next will keep the heading and the content together, separated by the specified spacing. This concept is illustrated in the following figure.
Document Structure: A Key Use of Styles
What is a style? A paragraph style in Word establishes virtually every aspect of paragraph formatting, either directly (that is, because you set it in the style), or indirectly (because it’s defined in the style that the style you’re specifying is “based on”). So, for example, the Normal style (which is the foundation for pretty much all others) may have the font set to 11‑point Calibri (the modern Word default). From there, you might create two styles based on Normal: one for section headings that you set to 14-point bold, and one for body text with the first line indented and a 6‑point space after. If you later decide you’d rather have your document in Century Schoolbook than Calibri, all you have to do is change the font selection in the Normal style. Your heading and body text styles will change typeface accordingly because they’re based on Normal, but keep their own additional formatting. While this maybe sounds a bit confusing and intimidating at first, once you play with it a little bit I think you’ll find it makes sense 13.
One good reason to care about styles is that if you’ve got a Word document of any length, you probably want to have sections or chapters, and subsections, and maybe a table of contents. To automate this, by far the easiest way is to format your section headings with appropriately defined Word styles.
An important related concept is outline level; to see this bring up the paragraph formatting dialog (Alt, H, PG) and take a look at the Indents and Spacing tab. In the upper corner there’s a control labeled “Outline level”. Every paragraph in a document is either associated with a level of document structure from 1 to 9 or is identified as “Body Text”. The outline level settings are used to identify section headings from most significant (Level 1) to least (Level 9). Every paragraph that’s not a heading should have an outline level of body text. (By the way, if some of your text that isn’t a heading is showing up in the table of contents or navigation pane, you need to go fix that paragraph’s outline level).
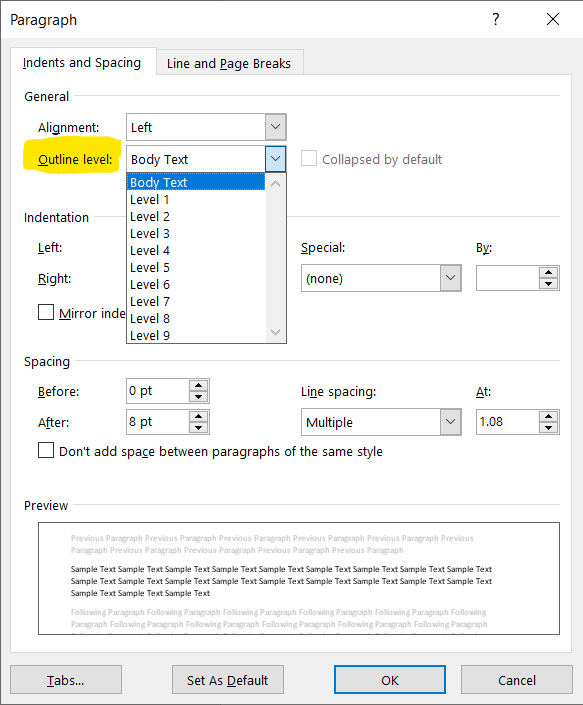
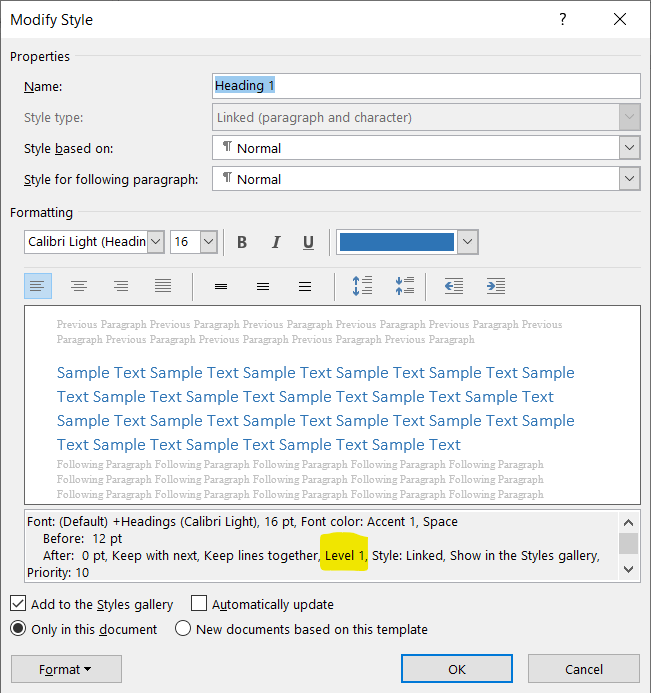
Word’s built-in Heading styles make this easy. Heading styles are your friend: by formatting your section headings with the Heading 1 through Heading 9 styles, as appropriate, they give a document structure, and make the navigation pane and the outline view useful. They also facilitate section numbering, table of contents creation, and the insertion of automated cross-references between sections. This dialog box shows the default settings for the Heading 1 style, with its Outline Level highlighted.
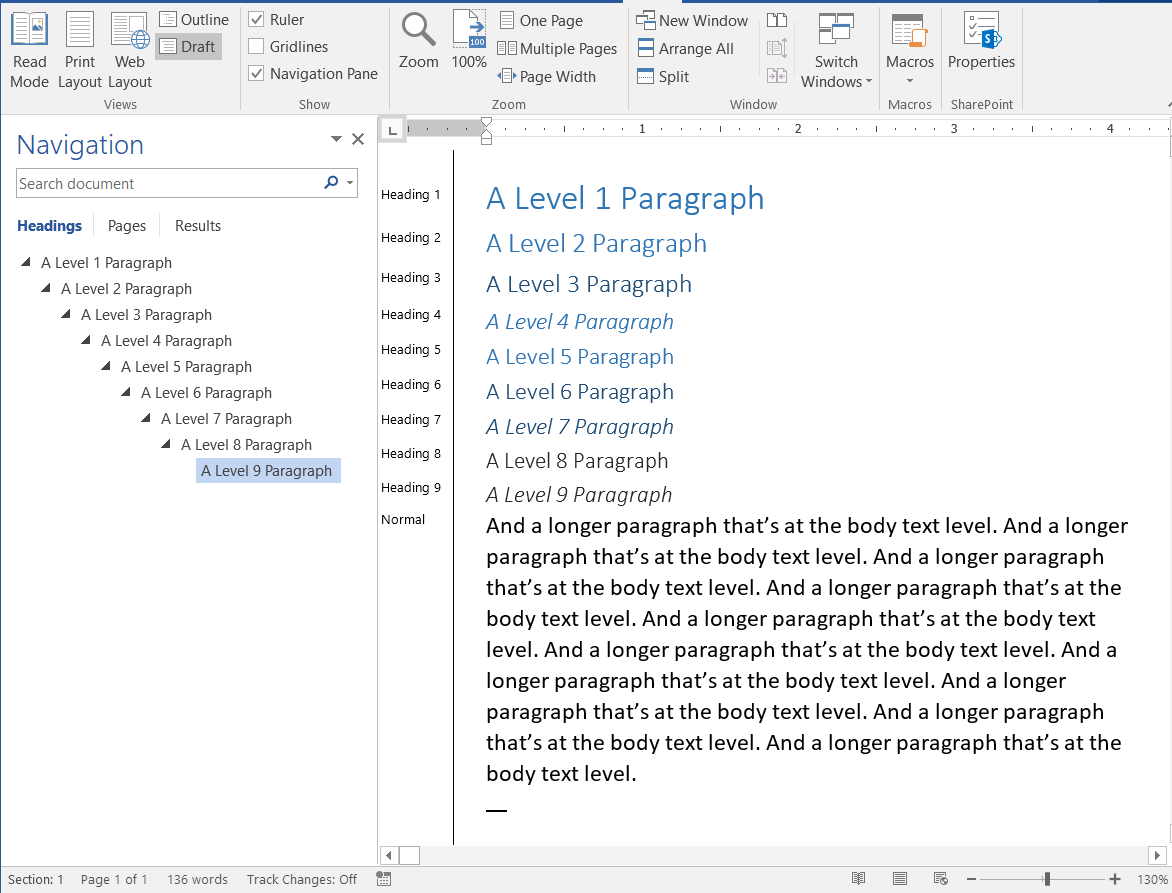
And this screen clip illustrates these concepts as a set: the document in draft view with the style pane visible shows the styles applied and the resulting formatting, and the Navigation pane illustrates how Word uses the Outline Level of the styles to define document structure.
If the look of the various headings isn’t your cup of tea, all of it can be changed for the whole document by altering the font, paragraph, and other formatting attributes of the style. For fun, create some content and apply the default heading styles at various levels. Then change the formatting of a heading style and you’ll see all the section headings change accordingly. There are also some built-in design themes on the Design ribbon that will adjust the paragraph styles en masse to alter the look of your document.
One of Word’s features is the ability to have the definition of a style automatically update when you directly format a paragraph of that style. In my view, the Automatically Update feature of Style definition is not 14 your friend, except when you are first building the set of styles for a document template file. If Auto Update is checked, a minor formatting tweak in one place in your document can wreak havoc with the whole thing, and you may not notice until you no longer remember what you did. The most outrageous case is if Automatically Update is set on the Normal style: make one paragraph in your document italic, or red, or a different font, and suddenly your whole document is italic, or red, or in a different font, since virtually every other style is based directly or indirectly on the Normal style. In the style formatting dialog there’s a check box for “Automatically Update”; you’ll want to uncheck that box so that your styles don’t go changing willy-nilly.
Learning about paragraph styles is really worthwhile. An excellent reference is a column by Woody Leonhard called Get into the basics of Styles in Word. Microsoft also has some videos on the topic on page about Using Styles in Word (video and transcript).
A few other appearance things are handled by special styles. I mentioned the Line Number style in the section on document formatting. Another one you might want to tweak is the Hyperlink style, which defaults to underlined blue text when you type an Internet URL. You can easily change the look of this by modifying the Hyperlink style. By the way, if you’d rather Word didn’t automatically convert URLs to hyperlinks, you can turn that off under File, Options, AutoCorrect Options, Autoformat As You Type tab, uncheck the “Internet and network paths with hyperlinks” option.
Document Templates & NORMAL.DOTX
Another confusing aspect of Word is document templates. The basics are as follows:
-
Template files have a .DOTX extension (in older versions, it’s .DOT; if the template also contains macros it will be .DOTM). Normal documents have a .DOCX extension.
-
If you double-click on a template file in Windows Explorer, you’ll get a new blacnk document in Word based on that template (basically, just a copy of the template that you’ll have to Save As a document). If you want to edit a template file, you’ll have to launch Word, and use File, Open, Browse (O) to find and open the template you want to change. You can change the files type setting to All Word Templates (*.DOTX, etc.) to just see templates.
-
All of your basic Word program settings and the format of a basic “blank document” are stored in a template file called NORMAL.DOTX. This template is automatically loaded when you start Word, even if you’re opening a file or have double-clicked on another template, in order to get all of those settings.
-
Any customizations you’ve made to Word are, by default, also stored in NORMAL.DOTX.
- A new document can be based on a template other than Normal. When you do that, the settings in the selected template, including any style definitions, boilerplate text, etc., are added onto the settings from NORMAL.DOTX. The selected template’s settings override corresponding ones in NORMAL.DOTX (e.g., if the Heading 1 style is different, the template’s version takes precedence). The important stuff from the selected template is incorporated into your new document. It’s important to know that once the document is created, there is no further connection between your new document and the template on which it was based. If you modify that template later, it won’t affect any existing document(s) based on that template.
- You can force Word to load templates in addition to NORMAL.DOTX when it starts up, but that’s something of an advanced customization thing that many people won’t need. Some third-party programs add in such templates when they’re installed in order to add features to Word.
By default, on a Windows 7 and above system the NORMAL.DOTX template is stored in the \Documents and Settings\ folder, under the user’s name. So on my system, it’s in:
C:\Users\<username>\AppData\Roaming\Microsoft\Templates
Depending on how your system is set up, the Documents and Settings folder may be on a different drive, but in any case that’s almost certainly where your NORMAL.DOTX template will be found.
For basic use of Word, you’ll probably find you can make a few modifications to NORMAL.DOTX/.DOTM to set the defaults for a blank document to something appropriate for your use, and then not worry about it very much. If you routinely create documents of each of several different types, it may save you a lot of effort to create a template for each. There’s an excellent and very thorough article on how to create a template available at the Word “Most Valuable Professional” web site 15. Microsoft also has a bunch of templates that shows up when you do File, New; if you pick one of them you’ll get the opportunity to download it and add it to your Word setup. A well-crafted template definitely makes creation of consistently formatted documents easier.
Customizing Word
Along with frequently offering two, three, or more different ways to do most everything, Word is also extraordinarily customizable. At the most basic level, you can very easily adjust the content of ribbons to have the stuff you actually use conveniently available (either right-click on the ribbon background and pick “Customize the Ribbon …” or select Alt, File, Options, Customize Ribbon). The details are explained in a Microsoft article Customize the Ribbon in Office. You can also easily assign your own keyboard shortcuts for instance access to functions you use frequently (the button to customize keyboard shortcuts is in the Customize Ribbon dialog (bottom left corner)).
At the upper left of the Word title bar is the “Quick Access Toolbar”. You can get to options to customize it similarly to those for the Ribbon. Microsoft also has a page about that. It’s important to know that to add commands to a ribbon you have to first add a “custom group” within the ribbon to hold those commands (you can customize ribbons but not built-in groups). The Quick Access Toolbar has no concept of groups, so they aren’t needed to customize that.
In the customization dialogs for both the Ribbon and the Quick Access Toolbar, there is a pull-down called “Choose Commands From:”, which controls the display of commands that can be added to the ribbon or toolbar. There are quite a few Word commands not exposed on the ribbon interface, some of which are quite handy. An example that can be found in the ribbon customization dialog by specifying “All Commands” is one that automatically tweaks all of the formatting of a document file to shrink it by one page; very useful if you’ve overshot by five lines on your 10-page essay. To find it, select File Options, Customize Ribbon…, and pick the Commands tab. Select “Tools” in the categories box on the left, and scroll the list of commands on the right down to one named “Shrink One Page”; it’ll be near the bottom of the list. Add it to a ribbon as explained in the Microsoft article linked above.
As noted above, these customizations are stored in NORMAL.DOTX by default. In the most extreme case, if you really screw things up you can delete NORMAL.DOTX and Word will recreate the file with the program’s original default settings. But don’t worry, you’ve got to work hard to screw things up that badly.
The ultimate approach to customizing Word is through the use of macros, which are written in Microsoft’s VBA (Visual Basic for Applications) programming language. I don’t intend to get into macros here, because that’s a big subject, but will offer a couple of notes:
-
By default, the help file for VBA is not installed along with Word. If you’re going to start learning to work with macros, it won’t take very long before you’ll want that help file, so you’ll need to go back to the installer to get it.
-
If you’re going to play with macros, start by bringing up the ribbon customization dialog and turning on display of the Developer toolbar.
-
The easiest way to create a simple macro is to use the recording function found at Alt, Developer, Record Macro. Record a macro, then use the Macros dialog on the Developer ribbon, select it and click edit. This will bring up the Visual Basic Editor, where you can clean up or extend the recorded code, or merge several recorded macros into one more powerful one.
-
A good reference book will probably prove pretty helpful. As in: completely essential.
-
Macros, once created, can be placed on a ribbon or the Quick Access Toolbar with the customize dialogs. They can also be assigned shortcut keys so that they’re easy to invoke.
Word is almost infinitely customizable with macros. It’s really quite amazing what can be accomplished.
Useful Resources
Microsoft has something they call the Most Valuable Professional (MVP) program of folks who really know their software. The Word MVPs site has a lot of great information: http://www.mvps.org/word. The Microsoft Office support site has a lot of information about all of the Office applications, although sometimes searching it can be a bit frustrating. The Word help page is a good place to start.
If you really want to dig in, Word 97 Annoyances remains a great book for how to think about what’s possible. While it was written for Word ’97, the majority of the concepts are applicable to subsequent versions of Word right up to the present day (albeit with some digging around to find where something moved to in modern Word versions), and it’s an extremely well-written book. Click here to visit Amazon.com’s page about the book; unfortunately, it’s out of print, so you’ll have to hunt for a used copy if you want one. Chapter 6 of that book is the best explanation of the fundamentals of Word formatting I’ve ever seen and should be mandatory reading for anyone who produces a document larger than one page in Word (I’ve tried to capture the essentials above). There are probably more recent books of comparable quality, but I haven’t looked so I’m not personally aware of any. At the time I read it, I considered Word 97 Annoyances the single most useful computer application book I’d ever read.
Happy writing.
Footnotes
-
I’ve never used Word on a Mac, so I have no insight into how applicable this guide is for Mac users. ↩
-
I know this sounds like I’m encouraging you to “think like the computer” but I don’t really mean it that way. I’m more suggesting that you wouldn’t use the side of hammer to pound your nails, so why use a word processor like a typewriter. ↩
-
You’ll also discover that there’s usually at least 2 ways to do most things, and sometimes as many as 5 or 6. ↩
-
If you want the skinny on how Microsoft defines the Ribbon interface, here’s an article for you. It’s written as guidance for developers but fills you in on the terminology and the underlying thinking. The up-front part (first few screens) are plenty for the casual reader. ↩
-
Some would probably say I’m obsessive about using the keyboard. They might well be right. And I have to concede that more recent versions of Word have made it a little harder to stay a keyboard fanatic. ↩
-
Having now developed some experience using Word on a virtual desktop infrastructure (VDI), I think this is probably even more true, given the visual lag that often occurs on the VDI. That said, I also find I can now type considerably ahead of the VDI, which is not an advantage. ↩
-
The contents of the ribbon change their appearance when the width of the window changes, so the ribbon screenshots here are approximations to what you will actually see; the important point is that the functions are there and the accelerator keys don’t change. ↩
-
This used to be called the Document Map. ↩
-
If you look carefully, one small tweak to the process in the article will give you a list of all Word commands. Fair warning: on Word 2016 that results in a 77-page long table of commands. By way of comparison, the keyboard shortcuts table is only 10 pages. ↩
-
This works in PowerPoint, too, although it’s just a little quirky there depending on whether / what text is selected. ↩
-
I’m showing my age with this. Long ago, word processors like WordPerfect and WordStar used in-line formatting codes. That’s pretty much dinosaur thinking these days. ↩
-
Which I think we can all agree is just kind of ugly. ↩
-
I have often wished for a tool that would print me out a tree of how styles depend on one another. ↩
-
Note that word is bold italic underline. I really mean it! ↩
-
Specifically, at http://wordfaqs.mvps.org/CreateTemplate.htm the article explains templates in more detail than I do here, and explains how to create them in different versions of Word from 2003 on. ↩
